


 |
| Did I mention the sun hasn't been out in over a week...the skirt is actually burgundy. |
- 1 yard fabric
- ~1 yd. matching bias tape
- corresponding thread
- embroidery floss
- needle
- small button
- ~2 yards matching ribbon at least 1" wide
This is for a size 2T:


Once your pieces are cut, stack up the dress pieces and cut out armholes and neck holes. The arm hole should be about 6" long and should start from the top corner - do NOT cut into the top. Your neck can be however you like, but just be sure to leave 2" for the strap. I found it looked nice to cut the front and the back the same depth...it makes for a pretty back.


Okay, this is the tricky part - not to do, but to explain. So, you need to cut out the armhole on your sleeve pieces. Fold it in half along the 7.5" line (shown above). Place this piece under your dress piece with the fold facing inward.


Once this is done, you need to make some adjustments to your machine before you start sewing. Turn your tension knob all the way up (usually it will be set around 4-5, so turn it up to 9 or 10 (or however high your numbers go). Now, set your stitch length as long as it will go. Mine is digital and is typically at 2.5 and goes up to 5. You want it at 5.
We will be making a gather on the top of the sleeve piece that you see above. So unfold your piece and sew from one end to the other - DO NOT BACK STITCH to secure your stitching. Once this is done, you are going to pull on both ends of the threads until you have a nice gather the whole way along this piece. This is going to be the center of the shoulder of your dress.

IMPORTANT: Return your sewing machine to the original settings!
Before we go any further with this, we need to sew together the two dress pieces at the shoulder strap ONLY. Be sure to do a zig zag stitch after the straight stitch to secure your seams.
Once this is done, line up your sleeve piece with the center of the gathered part at the top of the shoulder. Place the rest of the piece into position and make sure that it all ends up in the right place. If this piece is still too long, then you may need to gather more fabric or gather the fabric more tightly. you may want to pin this down before sewing it. Be sure that the stitching is on the inside of the seam and does not show. Sew all around the armhole on both sides. Now repeat with the other sleeve. Your sleeves should look nice and puffy.

Now we want to sew up the sides of the dress and the sleeves. So, line them up at the armpit and sew the whole length from end of sleeve to hem of dress. Go back and zig zag stitch the whole length. Go ahead and turn your iron on now.

Lets finish off the sleeves. For the bottom of the sleeve, I just manually do about 3 pleats/gathers and then pin them down (right in the center). Now sew the seam as you normally would.


Go ahead and sew the hem of the dress now as well since you have it all ironed out.
Next, we are going to finish off the neckline. Unless you are using a knit fabric or you used a seriously deep cut to the neckline, this dress is going to be a little tough to get over your little bean's head. To solve this problem, I cut a little keyhole in the back. Fold your dress lengthwise in half so you can make a little cut at the neckline for the keyhole.


 |
| should look something like this. |
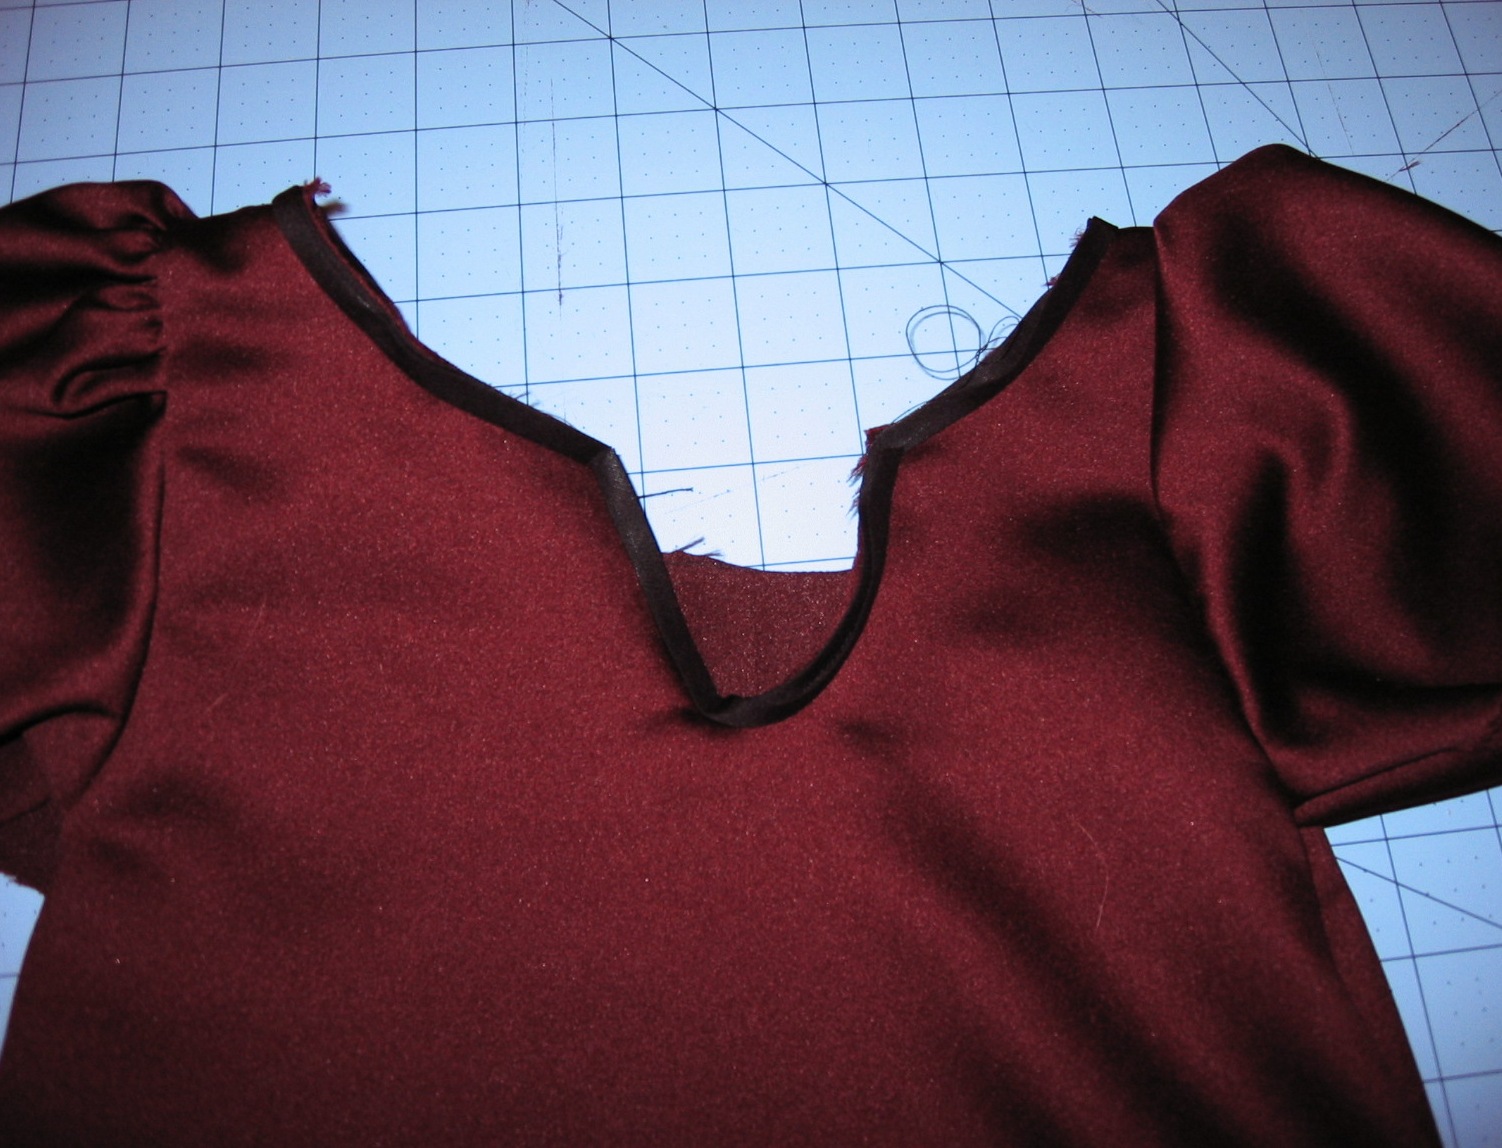
With the corresponding bias tape, start at the top of the keyhole and go all the way around the neckline. Open the bias tape and place against the RIGHT side of the fabric. The edge of the bias tape parallel with the edge of the fabric. Pin in place if you would like. When you fold over the bias tape, it should look closed on the INSIDE of the dress. Hopefully that makes sense. Now sew it down along the middle/crease of the bias tape.. Repeat with a separate piece along the keyhole. Trim the corners of the keyhole before you fold this over. Now sew all around the neckline to secure bias tape down.

 |
| Bias tape complete around edge. Now flip over to sew. |
 |
| All done |
So, I bought little tiny buttons, but of course, you can use whatever you like.
Just sew the button down to one corner of your keyhole and then thread a loop with embroidery floss through the other side so it looks like this. Super easy.

Now for the ribbon. Sewing it down is entirely optional, but I would recommend it if your toddler is going to be active in the dress. Be sure to use a fabric ribbon that is meant to withstand washing. Being very careful to make sure that the ribbon is straight and level, pin it down on the front of the dress. Sew along the top of the ribbon from one side to the other and then sew along the bottom of the ribbon from one side to the other. Leave the back loose for tying (i.e. don't sew the ribbon on the back of the dress).

Here is the pic of the Christmas dress taken before the sash was attached and before the camera incident. Turn your neck sideways because every time I tried to rotate this particular photo, it would ruin it. What can I say, technology hates me today.
 |
| Finally found a use for that J Crew sash that used to be popular |
I will post an update with Little Bean in the dress along with my mama mini that I made out of the rest of the fabric. Stay tuned, please.
Please, please, please post pics of any of your party dresses using this tutorial!
I absolutely LOVE the lime green/burgundy combo! Gorgeous!
ReplyDeleteHi! You gave the pattern for the sleeve, yet when you cut the sleeve it looks like a rectangle. Is that right?
ReplyDeleteThank you! I loved the dress!