Showing posts with label clothing. Show all posts

Sunday, April 10, 2011

California Dreamin' Tube Top Tutorial

Consider yourselves warned...my arms are very white and I am a terrible model.  That being said, I am tremendously excited about this tutorial.  I LOVE summer and the sun.  Therefore I love summer clothes.  I have been dreaming up this tube top in my head for weeks now and it has finally materialized.  It is really easy and dare I say, really chic.

It was about 39 degrees and windy outside.  Yep, I'm that dedicated.


This is just a white interlock knit.  Super simple.  If you have not sewn with knits before, this is a great place to start.  No serger needed (although I dream that I will someday have one for projects like this).

What you need:
  • one yard knit fabric
  • coordinating thread
  • 1" wide elastic (amount will depend upon your underarm measurement)
Start by taking your underarm measurement - right at your armpits.  Mine was 32.5".  Since we want all of the fabric to be gathered...add 12.5" to your measurement, so mine was 45".

For the length of the main piece, I went with 19".  However, I have an incredibly long torso, so if you are more average, you may want to go with 17".  But go ahead and measure - you will want the top piece to end  at the top of the hip...allow 1" total for seam allowance.

So, the first piece = underarm measurement + 12.5" x 17-19"

For the second piece, turn your fabric around and find the direction that does not stretch very much.  You want to cut in this direction.  In other words, you don't want the piece that sits on your hips to stretch very much so it will hold that nice shape.  So, measure well.  Take your hip measurement at the widest spot (mine was 34") and add .5" (so my piece was 34.5" long).  The width should be 11".

Second piece = hip measurement + 1/2" x 11"


Using the top piece (the large piece) decide which edge is the top and do a zig-zag stitch (or serge) along the top edge.

Now, with right sides facing, line up the edges (side of your top).  Stitch all the way from the bottom to top and then finish off with a zig-zag stitch).


Back to the top.  Fold over the top edge 1 1/4".  Stitch all the way around leaving a 1 1/4" gap to feed your elastic through.

For the elastic, my measurement was 32 1/2" but I don't want my top to fall down in the least bit, so I want my elastic working for me.  I cut it at 28" + 1/2" for total seam allowance.
Elastic = underarm measurement - 4"
Using a safety pin, feed the elastic through.


Once you have made it all the way around, stitch the elastic together VERY well.

Now to the smaller piece (bottom of your tube top).  With right sides together, stitch the sides from bottom to top.  Finish off with a zig-zag stitch.

Now, with the right side facing out...fold your top in half so it looks like this...


Turn your machine's tension all the way up and also set your stitch length at the maximum.  We are going to gather the bottom edge of the top piece.  Do not back stitch here and be sure to leave long threads on either end so that you can alter your gathering, if necessary.
It should look like this.

Now you are going to want to play with the gathers a little.  Using the threads you left on, pull  and stretch until your gathered edge is the same length as the bottom portion of the top (the piece pictured below).
Once you have this complete, you want to line up all of your rough edges.  Make sure that your top is right side out.  All the right sides are facing here.  


Now stitch all the way around and secure the seam with a zig-zag stitch.

Flip inside out and voila, it's done! 
Note:  For wearing, I turned the top elastic edge under so it looks a little more sophisticiated, but it looks great either way.


As always, if you make this project, please send me pictures!

Saturday, December 4, 2010

Reader Projects

I am so thrilled that the Peasant Dress Tutorial is working out for so many of you!  And there have even been a couple of you kind enough to send pics of your projects.  Here they are:

Crystal of Crystal's Big Girl Blog and Dekked Out Baby Bums sent in this cute version made out of fleece.  I love that she used different fabrics for the arms!


And Ashley over at Chickadee Chickadee Clothing made this beauty.  She uses the most amazing fabrics in all of her work.  I really need to figure out what it takes to get sponsored and get some swag.  Anyone know?  Anyways, both the dress and the model are gorgeous!


Thank you ladies for sharing!  I love getting these photos!

Thursday, December 2, 2010

20 Minute Tunic Jumper

This is one of those "happy accident" projects where you start out doing one thing and then to fix it, you end up somewhere else.  This is the quickest and easiest project and I really believe that anyone can do it.  It's definitely nothing new...a jumper.   I ended up making it way too wide, so I gathered the middle in the front and the back (which is a cinch) and it adds just enough detail to make it special.

LOVE this fabric...it's corduroy too!
 Here is what you'll need:
  • 3/4 yard of fabric
  • thread
  • hand sewing needle
  • 20 minutes, seriously
Here is the pattern for a 2T (you'll need two of these):

Okay, so you may have noticed that this is A-Line.  I happen to make everything A-Line, because I like the way it fits and it allows room to grow for the next season (if I'm really lucky...the next year). 


Fabric piece

So, once you have cut out your two pieces of fabric, you will want to lay them side by side and cut out your necklines.  Keep in mind that this is a jumper and therefore meant to have another top under it, so go big.  I like the front to scoop lower than the back on this one.  You will want to keep 2.5" for the shoulder straps.


Now, we need to cut the arm holes.  Again, since this is a jumper, I went big.  I cut mine at 6", but you could easily get away with 5" for a 2T.  Cut them while the fabric is still folded, so each side is the same.  You can stack both pieces as well...makes it even easier. (Tip:  Don't cut away any of the shoulder strap).


Now sew the two pieces together at the shoulder only.  Reinforce your seams with a zig-zag stitch (or serge if you are lucky enough to have a serger).


Now lay out your garment flat...


And zig-zag stitch all the way around the neckline, so it looks like this:


Now, you'll want to fold it over and sew a "hem" all the way around the neckline.  You can iron if you want, but I find it way more difficult than just being careful as I go (especially since it is curved).  Don't double fold the hem since we want to gather it later and that will be too bulky.  This works great, I promise.

Repeat the last two steps with the arm holes.


Sew up the sides of the tunic with the right sides together and reinforce the seam with a zig-zag again.

Almost there...

Lets gather the fabric now.  I did both the front and the back.  If you want to do just the front, then I would make the back piece a little narrower when cutting the fabric.

I just grabbed the fabric and bunched it with my fingers until I was happy with it.  I stuck a pin in ti and then compared it to the neck of another of Little Bean's dresses to make sure the size was right.  If your child has, err, a large head, you may want to try it on them before sewing this up to make sure that it will still fit over it.


Once your gather is pinned, thread up the old sewing needle.  I just simply went through the gathers about 1/4" down from the neckline.  I went back through a couple of times to ensure that it wouldn't come undone.  Tie a knot and that's it.

Finally, hem the bottom by folding over the fabric 1/4", iron down, fold over 1/4" again and stitch.  Or, you can use the same method that we used above for the neck and arms.

Voila! 


Seriously, wasn't that fast?  I may have to make several of these.  They jazz up a plain long sleeve t-shirt and leggings quite nicely, don't you think?


Enjoy!  And this should be the last post with horrid pictures.  Should be getting my new camera today! 

As always, comments are appreciated!

Wednesday, November 3, 2010

Toddler Dress Sizing...my best guess

I  have had a few comments asking me what the measurements would be for different sized toddler clothing.  While the overall answer is, I don't know, I have searched and found some info for you. 

My daughter just turned two, but she is at the 90th percentile for height and 40th for weight.  Keep that in mind when I give you the adjusted numbers here.  I make everything to fit her (not by a set size).  From clothing measurements by several companies, it appears that 2" is added to the length for every year.  So, if a 2T is 21.5" long, then a 4T would be 25.5" long.  I would also add 2" to the sleeve length.  It also appears that you want to add about 3/4" for every year for the chest measurement (i.e width of the dress).

Here is what I have come up with for a 4T:

For the 4T, I would also make the armpit cut another 1/2 deep, so 6.5" instead of 6".  I have added 1" additional fabric for the circumference of the arm.  This might be a little excessive, but you can always cut it out if you need to. 

For the reader who asked about 18 months sizing, you can just cut all of the adjustments listed above in half.  Although, if it were me, I would just follow the 2T measurements because this dress is VERY forgiving size wise and the 2nd birthday will be here before you know it!

Please let me know how this works out.  You can post any adjustments in the comments which would surely be helpful to other readers.  Thanks!

Monday, November 1, 2010

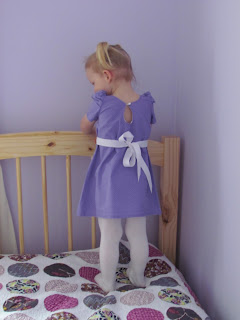
Toddler Party Dress with Puffy Sleeves

I made this dress for Layla's birthday party and it got a lot of great feedback, so I thought that I would do a tutorial for it. 


The tutorial will be in a different fabric since I was totally winging it with the first one and I didn't take any pictures (honestly, cause I had NO idea if it would actually amount to anything).  This fabric is a repurposed long skirt that I bought years ago for a holiday party and of course is no longer in style.  My plan:  to make a mini skirt for me for our Christmas party and a matching dress for Layla. 
Did I mention the sun hasn't been out in over a week...the skirt is actually burgundy.
You will need the following supplies for this dress:
  • 1 yard fabric
  • ~1 yd. matching bias tape
  • corresponding thread
  • embroidery floss
  • needle
  • small button
  • ~2 yards matching ribbon at least 1" wide
Here's the pattern in all it's glory.

This is for a size 2T:


Once your pieces are cut, stack up the dress pieces and cut out armholes and neck holes.  The arm hole should be about 6" long and should start from the top corner - do NOT cut into the top.  Your neck can be however you like, but just be sure to leave 2" for the strap.  I found it looked nice to cut the front and the back the same depth...it makes for a pretty back.


Okay, this is the tricky part - not to do, but to explain.  So, you need to cut out the armhole on your sleeve pieces.  Fold it in half along the 7.5" line (shown above).  Place this piece under your dress piece with the fold facing inward.

 Now, just cut around the very bottom of the armpit piece and then remove the dress piece.  Instead of following around the rest of the armhole, you are going to cut an arc from the bottom to midway along the top of the sleeve piece.  See below.  Repeat with other sleeve.


Once this is done, you need to make some adjustments to your machine before you start sewing.  Turn your tension knob all the way up (usually it will be set around 4-5, so turn it up to 9 or 10 (or however high your numbers go).  Now, set your stitch length as long as it will go.  Mine is digital and is typically at 2.5 and goes up to 5.  You want it at 5.

We will be making a gather on the top of the sleeve piece that you see above.  So unfold your piece and sew from one end to the other - DO NOT BACK STITCH to secure your stitching.  Once this is done, you are going to pull on both ends of the threads until you have a nice gather the whole way along this piece.  This is going to be the center of the shoulder of your dress.


IMPORTANT:  Return your sewing machine to the original settings!

Before we go any further with this, we need to sew together the two dress pieces at the shoulder strap ONLY.  Be sure to do a zig zag stitch after the straight stitch to secure your seams.

Once this is done, line up your sleeve piece with the center of the gathered part at the top of the shoulder.  Place the rest of the piece into position and make sure that it all ends up in the right place.  If this piece is still too long, then you may need to gather more fabric or gather the fabric more tightly.  you may want to pin this down before sewing it.  Be sure that the stitching is on the inside of the seam and does not show.  Sew all around the armhole on both sides.  Now repeat with the other sleeve.  Your sleeves should look nice and puffy.


Now we want to sew up the sides of the dress and the sleeves.  So, line them up at the armpit and sew the whole length from end of sleeve to hem of dress.  Go back and zig zag stitch the whole length.  Go ahead and turn your iron on now.


Fold your sleeves over as little as possible and iron down and then fold over 1/4" again.  Iron down.  Do the same thing with the hem of the dress.

Lets finish off the sleeves.  For the bottom of the sleeve, I just manually do about 3 pleats/gathers and then pin them down (right in the center).  Now sew the seam as you normally would.


It should look like this, although hopefully less blurry :)


Go ahead and sew the hem of the dress now as well since you have it all ironed out.

Next, we are going to finish off the neckline.  Unless you are using a knit fabric or you used a seriously deep cut to the neckline, this dress is going to be a little tough to get over your little bean's head.  To solve this problem, I cut a little keyhole in the back.  Fold your dress lengthwise in half so you can make a little cut at the neckline for the keyhole.


should look something like this.

With the corresponding bias tape, start at the top of the keyhole and go all the way around the neckline.  Open the bias tape and place against the RIGHT side of the fabric.  The edge of the bias tape parallel with the edge of the fabric.  Pin in place if you would like.  When you fold over the bias tape, it should look closed on the INSIDE of the dress.  Hopefully that makes sense.  Now sew it down along the middle/crease of the bias tape..  Repeat with a separate piece along the keyhole.  Trim the corners of the keyhole before you fold this over.  Now sew all around the neckline to secure bias tape down.


Bias tape complete around edge.  Now flip over to sew.
All done
How ya doing?  We're almost there!  Now, we just need to attach a button and a sash or ribbon to finish it off.  Forgive the switch back to the other fabric...some little toddler I know just threw my camera on the floor and it's having issues.  I needed a new one badly anyways.

So, I bought little tiny buttons, but of course, you can use whatever you like.
Just sew the button down to one corner of your keyhole and then thread a loop with embroidery floss through the other side so it looks like this. Super easy.


Now for the ribbon.  Sewing it down is entirely optional, but I would recommend it if your toddler is going to be active in the dress.  Be sure to use a fabric ribbon that is meant to withstand washing.  Being very careful to make sure that the ribbon is straight and level, pin it down on the front of the dress.  Sew along the top of the ribbon from one side to the other and then sew along the bottom of the ribbon from one side to the other.  Leave the back loose for tying (i.e. don't sew the ribbon on the back of the dress).


Here is the pic of the Christmas dress taken before the sash was attached and before the camera incident.  Turn your neck sideways because every time I tried to rotate this particular photo, it would ruin it.  What can I say, technology hates me today.

Finally found a use for that J Crew sash that used to be popular


I will post an update with Little Bean in the dress along with my mama mini that I made out of the rest of the fabric.  Stay tuned, please.

Please, please, please post pics of any of your party dresses using this tutorial!