Showing posts with label gifts. Show all posts

Monday, February 4, 2013

Play Vet Clinic and Felt Band-Aid Tutorial

Little Bean's favorite things to play with have always been her stuffed animals.  And she has a ton.  Thanks, in part, to my love of stuffed animals as a child that my mother held on to for me.  She loves barbies too and just HAD to have a barbie house from Santa for Christmas.  But, most often I catch her playing with her stuffed animals...feeding them lunch, tucking them into bed, etc.


So, when a friend of mine pinned THIS on Pinterest, I knew that I had to come up with my own version of a play at home vet clinic for her.  It cost me about $10 total. 

I picked up these cute wire baskets at the dollar store as well as the clipboard (below).  And then I went to Hobby Lobby in search of some dry erase labels for the basket.  I didn't find any, but I am glad since I saw packages of wooden stars instead ($1.50/4 stars).  Once I got them home, I drilled holes in them and then painted them with leftover chalkboard paint that I had on hand.  Then I just used some twine that I already had to tie them to the baskets.


Now she can't exactly write or read a lot yet, but I knew we needed to have some sort of "chart" for the animals.  I found the printable HERE.  She enjoys using these, but she likes it more when I can document detailed notes for her.

She was telling me that she needed band-aids for her animals today.  Her doctor kit came with a bunch of sticker band-aids, but those all got used up during one play date.  So, I searched for a tutorial to make some.  I was shocked that I couldn't find one.  I did find some for sale on etsy for $16, but that is a little steep for this.  So, I winged it.  And it's crazy easy to do.  Even once I started taking pictures to do a tutorial, it only took a matter of minutes.

Poor Fluffy
I used supplies that I already had on hand.  You only need some brown felt (or whatever colors/patterns you desire), some white felt, and some Velcro along with basic sewing supplies (scissors, thread, machine).


First, start with the Velcro.  You will only need to use the scratchy side.  So, yes, you will be stuck with unmatching Velcro pieces...annoying, yes.  Just cut it into whatever size lengths you would like...ours are between 2 and 3 inches.  Then round out the corners so they are shaped like band-aids.


After I had all these cut out, I just placed them on the felt and sewed them on, one at a time without cutting the felt.  Like this...
 

It will look like this...

Back

Front
After this was done, I just trimmed around the edge.  I left a bit of an overhang (of the brown felt).


Now cut a small rectangle of white felt to stick in the middle to be the absorptive pad of the band-aid.
 
 
 Sew on.

Front

Back
Voila!  That's it.  Now repeat.  And watch your child enjoy fixing all of her creatures.
 
 
Something tells me that Moosy has had better days.


This is her doctors bag.  It's mainly just the store bought kit with lots of extra syringes (minus the needles).  The girl loves giving shots...in the neck.  Weird?

 
We even have diapers for the tiniest of guests (courtesy of a friend who works in our local NICU).  Apparently, if diapers get dropped, they get tossed in the NICU.  Works for us!
 
 
Unfortunately, my little bean was being crazy camera shy today (which is very out of character).  So, no cute little vet pictures today.


Thursday, March 10, 2011

Wipeable and Reversible Placemat Tutorial

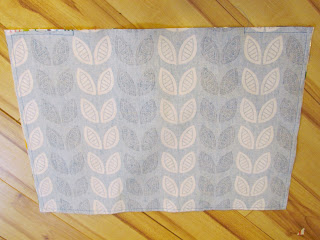
I have been trying to figure this out for a while now.  I want my table to be dressed nicer, but with a toddler around, it is just not practical to have linens on the table.  I thought maybe to use oilcloth, but it tends to split fairly easily, so turning would be a problem.  Then I thought I could avoid turning by using bias tape, but then the bias tape would get dirty.  Them I came across a blog post (which I lost the link, ugghhhh!) that used dollar store foam placemats and covered them with fabric and iron-on vinyl.  I was so excited - I had never heard of iron-on vinyl before.

So, I decided to skip the foam placemat and just make mine with fabric. 


I am really happy with the result.

Here is what you'll need to make 4 of these:
  • one yard of home decor weight fabric
  • one yard of complimentary fabric, preferably home decor weight, but not necessary
  • 3 packages of iron-on vinyl (2 yds x 17" per pack) - creative couponing at Jo-Ann's worked well for me here.
  • Corresponding thread
  • Iron
Start by cutting out your fabric pieces.  Each piece should be 19.5" x 14".  be sure to pay attention to which way you want the print to go on your placemat.


Next, cut out your vinyl pieces.

Yes, I am aware this is upside down, but I'm running out of time :)
Now is your chance to iron out your fabric perfectly smooth.  Hold the steam though...you don't want your fabric wet.


Peel off the vinyl piece from the backing.


Place it on top of the RIGHT side of your fabric.


Smooth out.

Now place the paper piece on top of the vinyl.


With your iron on medium heat and no steam, begin pressing...follow package instructions to be sure you get a good bond.


Now flip your fabric piece over and press again.


Turn it back over and peel off the paper.  Voila.  Repeat with the other 7 fabric pieces.


Now place your two different fabrics with right sides facing each other.  Do not pin as you'll puncture the vinyl.  Carefully sew around the edges leaving a large hole for turning - this is much more difficult to turn than regular fabric...leaving a large opening will help cut down on wrinkling.


Note how I sewed "into" the piece before I started sewing around the edges.  This helps keep everything more stable when you are turning. 

Cut all four corners on the diagonal.


Turn the placemat inside out.  it will be a wrinkly mess:.  Don't worry.


Go back to the ironing board.  Fold under the opening and hold it steady.  meanwhile, place the paper that you used for pressing back on top and iron the opening.  Warning:  The two sides will fuse together...so you only get one shot here.  Now continue to press the whole placemat, both sides.  I found that using high heat here was very helpful.


Much better, right?


 Now top stitch all around.  Tip:  Use a dark colored thread, otherwise with frequent wiping, light colors will become very dingy.

So, there you are...a super easy and fun way to update your kitchen table.  I love how I can mix and match them to suit my mood/decor.

I hope you enjoy these as much as I do!

Wednesday, February 9, 2011

Carry-on Toiletry Bag and Tutorial

Isn't flying such a gorgeous experience these days.  You have to take off your shoes in public unsanitary places, potentially get strip searched, pay to check bags...what's next?  Well, here is something that can maybe, just maybe make carrying on a little easier.  I was literally just using freezer bags for all of my stuff (well, they end up needing to be there anyways).  So, I wanted something that was just slightly more stylish than freezer bags.


Labeled, just in case I forget ;)

I made it so that it would hold my little 3 oz or less containers...this is not intended to hold full size toiletries.  But it holds everything that I need for a short trip.


I'll get to the how to in a second.  The pictures in the how-to are from the prototype (pictured on the left) which ended up being just a little bit off size wise.  So, bear with me.


Supplies needed for this project:
  • 1/8 yard oil cloth
  • 1/8 yard coordinating home decor weight fabric
  • ~4 yards bias tape
  • metal snap or sew in velcro
  • thread
  • ~3 inches of elastic (I used 1/4" width)
  • pins
I used oilcloth so that this would be easy to wipe down.  you certainly don't have to, but if you use a cotton, I would be sure to use home decor weight for both sides or sew in some canvas to make it heavy enough.


Start out by cutting two rectangles 16 1/2" x 10 1/4"
Fold each piece in half vertically and then cut the corners to round them off so they look like this:


 Then cut two 10 1/4" x 3 1/2" strip out of your inner fabric.


Sew the bias tape to the top of each of your strips by first sewing the inside of the longer side onto the back of the piece (see picture).


Then flip the bias tape over and sew the front side being sure that you "catch" the back as you sew.

front side


back side
 Decide exactly where you would like to place your "pockets" and pin them to the inner piece.


Now sew around all three sides of the pockets.  On the sides you want to stay quite close to the edge so that your stitching is covered by the bias tape at the end.


Optional:  I sewed on the pockets so that each one would be divided.  I made two pockets on the top and three on the bottom.  Just measure them out before you sew so they are even (skip down a couple of pics to see).

Cut your elastic to be about 3" (Note:  I wanted my toothbrush case to fit in here...but if you just want to fit a toothbrush by itself this loop will need to be much smaller.


Form it into a loop and sew one end down just beneath your top row of pockets. 


Loop it over and sew down the other end.  Secure it well.

Note:  If you are sewing on velcro, then you will want to do it now.  Figure out exactly how you want the bag to close and mark the places with a disappearing ink pen.  Sew on the velcro.


Oh I almost forgot...for those applique letters...follow the tutorial here over at Make It Love It.  You'll want to do that now too!

Now we are going to finish it off.  With the wrong sides facing each other, stack up your front and back pieces.  Pin in several places.


 Starting at the bottom, sew your bias tape on (as you did above).  Flip it over and stitch down.


Measure out where you would like your clasp or your elastic to be on the bag.  Mark it with a disappearing ink pen.  I used a metal clasp on this one, but used velcro on the other.  If you sew on velcro, you will have already done so.  I decided to go through all layers so that the clasp would be sturdier...oilcloth has a nasty habit of tearing.


Insert clasp according to package directions.  Be sure that you are putting it in correctly...and not backwards like I did the first time...those suckers are hard to get out!


how the clasp should look

here's the velcro version...ignore messy sewing machine thread jam
I hope that somebody can find this useful for their travels and overnight stays.