Thursday, September 27, 2012

Reader Circle Quilt Pictures

I feel like a proud mama, in a weird way.  I received the NICEST string of emails from a reader, Kimberly, who recently completed the front and back pieces of her version of the Little Bean Circle Quilt.  She did such an amazing job that I had to share the pictures.  She did a better job than I did on mine, for sure!

Instead of using a whole sheet as I did, she used squares and attached her circles to the squares and then pieced the squares together.  It looks amazing and she definitely has more patience than I do.  I love how she appliqued her son's name onto the circles.  Really clever.


Front of the quilt


Back of the quilt, which Kim claims she has to re-do since the fit isn't right.  Bummer!


(Yes, I realize these pictures are tiny, but every time I enlarge them they get blurry.  Please click on them to see them better.)

It humbles me that someone 1. actually read the blog and attempted the project and 2. took the time out of their day to thank me and share their success with me.  I am completely tickled every time I get a comment or a thank-you on this blog.  I know I don't have a large following, but the kindness of those who do read makes it so worthwhile.  So, thank you.

If anyone has any photos of completed projects from this blog, I would love to see them and share them!

Thank you so much Kim!  You have inspired me to keep up with the blog and to try to create more projects.

Tuesday, September 18, 2012

Tabata Workout

Today I was awoken to the annoying squeak of our puppy's favorite toy...at 5:45.  Ick.  I was afraid that he would wake Little Bean, so I hustled out of bed and decided to take him for a run/walk.  I prefer to run, but Dexter prefers to sniff everything and freak out at every noise, so we move a little slow. 

I didn't feel that our outing was sufficient for exercise, so I decided to do some Tabatas.  If you aren't familiar with Tabatas, you should give it a try.  It is fast becoming one of my favorite ways to exercise. Basically, you exercise at an intense level for 20 seconds and then rest for 10 seconds for a total of 4 minutes.  That would be one Tabata.  It is a great way to do HIIT (high intensity interval training), which is supposed to be way more efficient than any other form of exercise.

So, here is the workout that I did today.  It is a total of 30 minutes and boy was I sweaty!


Click on image to see in full screen


If there are exercises that you aren't familiar with, check out www.youtube.com and do a search.  There are all sorts of videos out there that have been really helpful to me.

I use a Tabata timer app on my iphone which makes it super easy to keep track of where you are.  It has a series of beeps, so you don't have to look up at all.

Also, if you don't have a full 30 minutes, or you don't want to get super sweaty, then you can do just a couple of Tabatas.

Enjoy!

Tuesday, September 11, 2012

Meal Plan 9/9 - 9/15

This is my first post in about 10 months.  Wow...how did I let that happen?  I guess life just got away from me.  I was inspired to start blogging again after getting the loveliest email from a reader who just completed her version of the Little Bean Circle Quilt.  She was so kind to take time out of her day to thank me for the project and she sent me pictures of her amazing quilt as well (which I will share in a separate post).  So, I am going to start back slow with a meal plan for the week.  Hopefully, tutorials and recipes to come...

Here is what we are eating this week:

Meal #1: Omelets with Avocado and Cheddar with Cucumber and Tomato Salad with homemade Balsamic Vinaigrette (gotta use up all of that produce from the garden!)
Meal #2: Spicy Tofu and Mint Avocado Salad (I baked the tofu sans the bread crumbs and added orange wedges to the salad)
Meal #3:  Slow Cooker Vegetarian Split Pea Soup and 30 Minute Rolls (1/2 whole wheat flour)
Meal #4:  Cauliflower Quinoa Casserole with Grilled Chicken Breasts (I use homemade cream of mushroom soup that I keep in the freezer in ziploc bags)
Meal #5:  Margherita Pizza with tomatoes and basil from the garden and Green Salad

Also, this week, I made 3 large batches of this Classic Roasted Salsa to use up tomatoes, peppers, and onions from the garden.  It's delish!

I hope you all have a great week!

Tuesday, November 29, 2011

No Sew Table Runner

I have been known to change my holiday decor year after year.  This year, I suppose, is no exception.  However, this year I have been extremely short on time.  So, for my dining table, I came up with a super simple, super cheap, and super chic (I think) table runner.


It is just a combo of burlap and faux satin fabrics.  To make this runner, you will need:

  • approx. 2 yards of burlap
  • approx. 2 yards of satin like fabric (or preferred complimentary fabric)
  • scissors
Seriously, that is it.  So, first lets start with the burlap.  When you have it cut at your fabric store...pay attention to HOW they cut it.  You will notice that they will make a little snip right at the edge at the desired measurement.  Then, they will take the thread that is there (going in the direction of the cut) and pull it out.  It may break, but just keep at it until you get the whole length out.  Once this thread is out, you will have a nice guide to make a perfectly straight cut.

I went with two yards of each fabric since that is 72" in length.  My table is 60" x 60" so that gives me a nice little hangover on each end.  Basically, add 12" to the length of your table to get the look that I have here.

Since my table is so wide, I went really wide with the burlap as well, 25".  Using the cutting instructions above, cut your burlap to your desired width.  Once you have made the cut, pull a couple of the threads out on the edge you just cut to give it a little bit of fray.  Lay on the table.

Next, you need to decide how wide to do your satin fabric.  I did mine at 15" so I would be able to see a decent amount of the burlap.  Make a snip at the edge where the selvage is.  Now tear down your entire length.  Yes, tear.  Then measure out your width, make another snip and tear down the whole length again.  The satin will be a lot messier and you will have strings everywhere.  Just snip them off.  Now lay on top of the burlap. 

Your edges will look a little rustic, like this...


Then, I just found these hurricanes (actually left over from our wedding centerpieces nine years ago - I have a ton and finally found a use), put plain white candles in them, and then filled in the hurricanes with fresh cranberries (I have no ideas exactly how long these will last, but one bag cost me $3, so cheap enough to replace if necessary).


And that is it.  Seriously about the easiest thing ever.  And another great thing is that once the cranberries are gone, this is completely neutral so I can leave it on my table throughout the year if I choose.


I had some leftover burlap that I had no idea what to do with.  So, when we brought home our poinsettias with their ugly foil wrapping, it came to me.  I just cut out a length of burlap long enough to wrap around the pot and cut it (I didn't bother with the complicated method above, I just eyeballed it).  Then I wrapped the burlap around the pot, tied it with some ribbon I had leftover from the banner on my mantel (scroll down to see) and then folded over the top edge.  So much nicer looking that that ugly foil, don't you think?


A friend of mine made the banner for me using her Cricut...I just LOVE it!


Tuesday, October 25, 2011

Rainbow Party!


My Little Bean has turned 3 years old!  It's so hard to believe...time goes so fast!  To celebrate the occasion, we had a rainbow party, by Bean's request.  She loves all things rainbow!  So, I really took the theme and went with it.  It was a blast to plan.  I wanted to share some pics with you all...


Here is the food table.  Our party was in the mid-afternoon, so we only needed snacks, rainbow goldfish, rainbow candies (sixlets), rainbow sprinkled dipped oreos, and rainbow vegetables.


A close-up of the dipped oreos, yummy.


And I got the most adorable printables for the party.  See below for resources.


A close-up of the cake, which of course, I did myself.  I have to thank pinterest for the inspiration!


And of course, the inside was rainbow too! 


Above both of the tables, I hung paper lanterns in rainbow colors!


And here is Bean in her rainbow party dress...complete with blue shoes and rainbow hair clips.


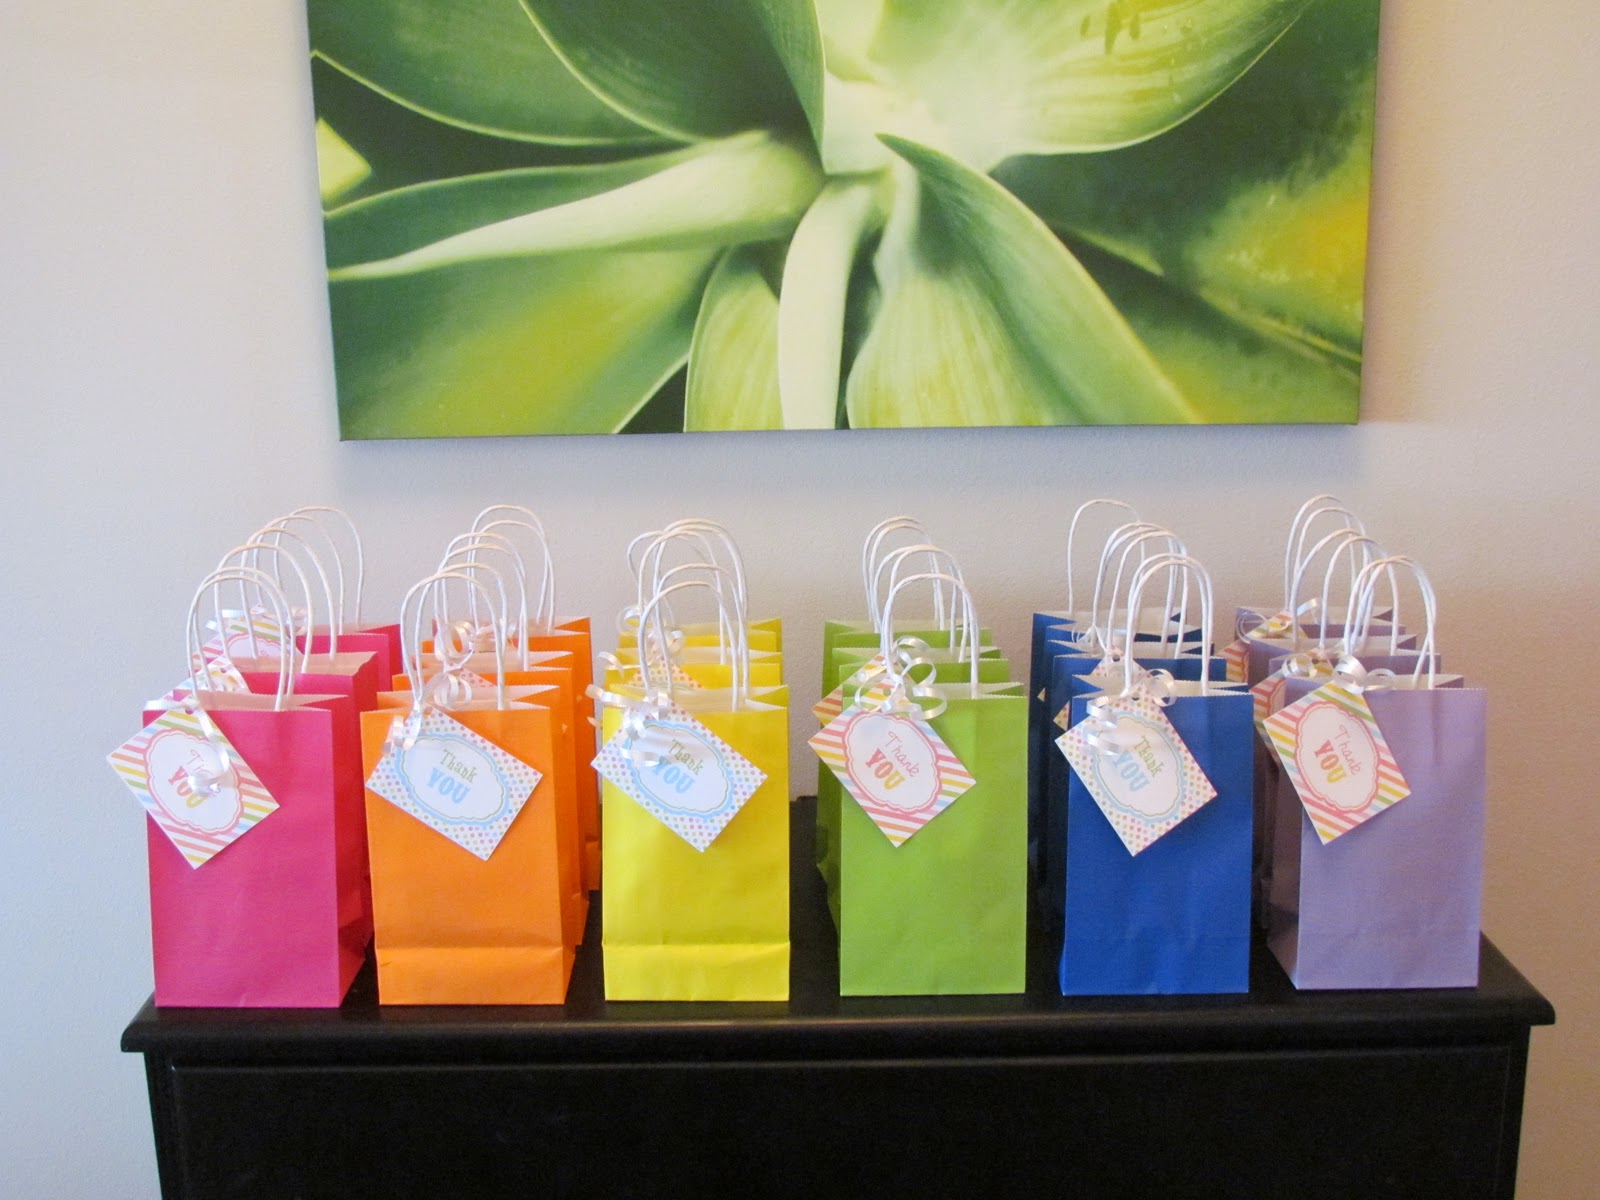
The gift bags which contained crayons (with rainbows on the outside), skittles, rainbow suckers (the round ones), rainbow leis, and rainbow hair clips (for the girls).


The party table...


Pinwheels made with rainbow scrapbook paper in vases filled with rainbow sixlets.


Since we were having this party in late October, we cannot count on the weather to be decent in any way.  So, I decided to provide crafts for the kids to do to keep them busy.  They seemed to be really successful.  First, I did a Froot Loop necklace craft (hint: don't use yarn as I did, find some cording, it will be easier to string the cereal on).


Second, I did a cloud with a rainbow craft.  Super simple and inexpensive, but the kids really enjoyed them.


A close-up of the lanterns over the party table...I didn't want to put holes in my ceiling, so I just tied them all on to my chandelier with fishing line.


Me and the Bean having a great time at the party...


Resources:

Printables (including invitations, bottle wraps, thank you tags, etc). - Bloom Events by SM
Rainbow Sixlets - Oh Nuts!
Chinese Lanterns - Asian Ideas
Rainbow Party Dress - Gymboree
Paper Treat Bags - Michaels


Tuesday, August 23, 2011

Cooking Motivation

No doubt, the bean and I have been enjoying our summer.  However, I have been lacking a little in the craft and culinary areas.  I have either been putting my effort in keeping up the outside or we've been out having fun in the sun while we can.  Oh, and my little bean stopped napping too, which of course gives Mommy even less time.

So, in an attempt to get some of my mojo back, I have given myself a little challenge.  I went to our little local health food store and picked up some spices that I don't regularly use and I am going to try to plan recipes around the spices.  I have also purchased a half a dozen cookbooks in the past month or so (now if I could find the time to sit down and go through them all).

First up:


Chipotle Chili Powder
Here are some of the recipes that I have found:

Fiery Chipotle Baked Beans (I'd omit the chorizo though)
I want to try using it in place of regular chili powder in my butternut squash and black bean chili
Also want to try in tacos


And next:


Smoked Paprika
Goat Cheese With Paprika, Garlic, Sun-Dried Tomatoes and Capers a Bruschetta recipe
Smoky Black Bean Soup
Baked BBQ Tofu (always wanted to try backed tofu - worth a shot!)


 Fennel Seeds
Fennel Seed Focaccia with Kalamata Olives
Spicy Turkey Sausage With Fennel Seeds
Marinara Sauce (always looking for a new take)

Garam Masala
Butter Chickpea Curry
Chicken Makhani

I also ordered za'atar from Amazon.  It's an Arabian spiced commonly used simply on bread brushed with oil.  Absolutely delicious!  I grew up in the Middle East, so it is very nostalgic.

I will report back if I find any to die for recipes.  And by all means if anyone has a recipe using any of these spices, please share a link!!!

Saturday, August 6, 2011

Furniture Revamp


 I was very fortunate that my mother wanted to pass on this lovely hutch for free.  It has a lovely antique quality.  It fit beautifully in her home.  She has a very eclectic and antique-y style.  She is a retired interior designer and has a beautiful home.  I, however, have a much more contemporary and non-eclectic style.  So, I decided to revamp the hutch to fit in with what I have (and kept my fingers crossed that Mom doesn't hate it!).

Here is the before picture, and please try to ignore the very, very messy garage in the background.  The upper glass doors were already removed for travel, so they are not shown in this picture.


Now, drum roll, here is the after:


I think it cost me about $35 to redo this, including all of the hardware.  I just bought some white paint (obviously) for the outside, a turquoise (Turquoise Bay at Ace Hardware) for the inside, and new knobs, pulls, and hinges.  I already had primer on hand.

Here is a close-up of the inside of the upper part.  I just love the pops of red with the turquoise.


And I stuck pretty true to the knobs that were on the original piece...the glass was just really yellowed so they needed to be replaced.  Very classic looking, I think.


I went a little more contemporary on the pulls, though.


All in all, I am super happy with how this project turned out.  It makes a beautiful addition to our home and gives me TONS of extra storage.  Also, it is an interesting process refinishing old furniture...when you get in there and see all of the stuff prior owners have done.  All of the nicks and nails...it makes you wonder about them - who they were, when they were, etc.

Have you had any successful furniture refinishing projects.  If so, give me the link or email a pic.  I am always inspired to see other peoples decorating!