Showing posts with label kids. Show all posts

Monday, February 4, 2013

Play Vet Clinic and Felt Band-Aid Tutorial

Little Bean's favorite things to play with have always been her stuffed animals.  And she has a ton.  Thanks, in part, to my love of stuffed animals as a child that my mother held on to for me.  She loves barbies too and just HAD to have a barbie house from Santa for Christmas.  But, most often I catch her playing with her stuffed animals...feeding them lunch, tucking them into bed, etc.


So, when a friend of mine pinned THIS on Pinterest, I knew that I had to come up with my own version of a play at home vet clinic for her.  It cost me about $10 total. 

I picked up these cute wire baskets at the dollar store as well as the clipboard (below).  And then I went to Hobby Lobby in search of some dry erase labels for the basket.  I didn't find any, but I am glad since I saw packages of wooden stars instead ($1.50/4 stars).  Once I got them home, I drilled holes in them and then painted them with leftover chalkboard paint that I had on hand.  Then I just used some twine that I already had to tie them to the baskets.


Now she can't exactly write or read a lot yet, but I knew we needed to have some sort of "chart" for the animals.  I found the printable HERE.  She enjoys using these, but she likes it more when I can document detailed notes for her.

She was telling me that she needed band-aids for her animals today.  Her doctor kit came with a bunch of sticker band-aids, but those all got used up during one play date.  So, I searched for a tutorial to make some.  I was shocked that I couldn't find one.  I did find some for sale on etsy for $16, but that is a little steep for this.  So, I winged it.  And it's crazy easy to do.  Even once I started taking pictures to do a tutorial, it only took a matter of minutes.

Poor Fluffy
I used supplies that I already had on hand.  You only need some brown felt (or whatever colors/patterns you desire), some white felt, and some Velcro along with basic sewing supplies (scissors, thread, machine).


First, start with the Velcro.  You will only need to use the scratchy side.  So, yes, you will be stuck with unmatching Velcro pieces...annoying, yes.  Just cut it into whatever size lengths you would like...ours are between 2 and 3 inches.  Then round out the corners so they are shaped like band-aids.


After I had all these cut out, I just placed them on the felt and sewed them on, one at a time without cutting the felt.  Like this...
 

It will look like this...

Back

Front
After this was done, I just trimmed around the edge.  I left a bit of an overhang (of the brown felt).


Now cut a small rectangle of white felt to stick in the middle to be the absorptive pad of the band-aid.
 
 
 Sew on.

Front

Back
Voila!  That's it.  Now repeat.  And watch your child enjoy fixing all of her creatures.
 
 
Something tells me that Moosy has had better days.


This is her doctors bag.  It's mainly just the store bought kit with lots of extra syringes (minus the needles).  The girl loves giving shots...in the neck.  Weird?

 
We even have diapers for the tiniest of guests (courtesy of a friend who works in our local NICU).  Apparently, if diapers get dropped, they get tossed in the NICU.  Works for us!
 
 
Unfortunately, my little bean was being crazy camera shy today (which is very out of character).  So, no cute little vet pictures today.


Tuesday, October 9, 2012

Mario cupcakes

A friend kindly asked me to do her sons birthday cake for his 6th birthday last weekend.  He is in love with Mario, so of course that is the theme we went with.  She found the inspiration for these cupcakes on Pinterest.  It was a really fun project...turned out a lot more time consuming than I had originally thought, but that is fine since I had such a great time doing it.


Mario looks a little portly...


 Sorry for the terrible picture...we were in a huge hurry to get these babies in the car and GO!  We would have been on time if I didn't have to stop at Starbucks every time I go somewhere.  It was a great party, all of the kids had fun and I think the birthday boy was pleased.

Tuesday, October 25, 2011

Rainbow Party!


My Little Bean has turned 3 years old!  It's so hard to believe...time goes so fast!  To celebrate the occasion, we had a rainbow party, by Bean's request.  She loves all things rainbow!  So, I really took the theme and went with it.  It was a blast to plan.  I wanted to share some pics with you all...


Here is the food table.  Our party was in the mid-afternoon, so we only needed snacks, rainbow goldfish, rainbow candies (sixlets), rainbow sprinkled dipped oreos, and rainbow vegetables.


A close-up of the dipped oreos, yummy.


And I got the most adorable printables for the party.  See below for resources.


A close-up of the cake, which of course, I did myself.  I have to thank pinterest for the inspiration!


And of course, the inside was rainbow too! 


Above both of the tables, I hung paper lanterns in rainbow colors!


And here is Bean in her rainbow party dress...complete with blue shoes and rainbow hair clips.


The gift bags which contained crayons (with rainbows on the outside), skittles, rainbow suckers (the round ones), rainbow leis, and rainbow hair clips (for the girls).


The party table...


Pinwheels made with rainbow scrapbook paper in vases filled with rainbow sixlets.


Since we were having this party in late October, we cannot count on the weather to be decent in any way.  So, I decided to provide crafts for the kids to do to keep them busy.  They seemed to be really successful.  First, I did a Froot Loop necklace craft (hint: don't use yarn as I did, find some cording, it will be easier to string the cereal on).


Second, I did a cloud with a rainbow craft.  Super simple and inexpensive, but the kids really enjoyed them.


A close-up of the lanterns over the party table...I didn't want to put holes in my ceiling, so I just tied them all on to my chandelier with fishing line.


Me and the Bean having a great time at the party...


Resources:

Printables (including invitations, bottle wraps, thank you tags, etc). - Bloom Events by SM
Rainbow Sixlets - Oh Nuts!
Chinese Lanterns - Asian Ideas
Rainbow Party Dress - Gymboree
Paper Treat Bags - Michaels


Friday, February 25, 2011

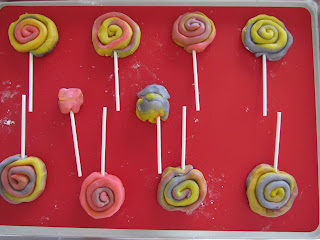
Snowy (or Rainy) Day Kid Project - Cookie Pops

Let me start by saying I take zero credit for any of these ideas.  I didn't even find this myself.  So, thank you to my friend Nicole who posted this link on Facebook which gave Little Bean and I a big project for the day.  And might I mention that we had a hideous blizzard two days ago which left is with 12 point something inches of snow...and now we have FRIGID temperatures...like -16 last night (yes, that is a minus sign!).  So, needless to say, we are  little stir crazy and this was the perfect project to fill a good part of the morning.

So, with out further ado...here it is..."play dough" cookie pops!


Aren't these so much fun?!  I don't know if I will ever make sugar cookies the regular way again!  Little Bean was REALLY into it too.  She had so much fun picking the colors (pink and purple, of course...and yellow) and of course playing with the dough.


Say "Cheese!"

This is the brainchild of Amanda's Cookin' (link here).  I can already think of a million different ways/occasions to make these.

Have I inspired you?  I hope so!


Thursday, December 2, 2010

20 Minute Tunic Jumper

This is one of those "happy accident" projects where you start out doing one thing and then to fix it, you end up somewhere else.  This is the quickest and easiest project and I really believe that anyone can do it.  It's definitely nothing new...a jumper.   I ended up making it way too wide, so I gathered the middle in the front and the back (which is a cinch) and it adds just enough detail to make it special.

LOVE this fabric...it's corduroy too!
 Here is what you'll need:
  • 3/4 yard of fabric
  • thread
  • hand sewing needle
  • 20 minutes, seriously
Here is the pattern for a 2T (you'll need two of these):

Okay, so you may have noticed that this is A-Line.  I happen to make everything A-Line, because I like the way it fits and it allows room to grow for the next season (if I'm really lucky...the next year). 


Fabric piece

So, once you have cut out your two pieces of fabric, you will want to lay them side by side and cut out your necklines.  Keep in mind that this is a jumper and therefore meant to have another top under it, so go big.  I like the front to scoop lower than the back on this one.  You will want to keep 2.5" for the shoulder straps.


Now, we need to cut the arm holes.  Again, since this is a jumper, I went big.  I cut mine at 6", but you could easily get away with 5" for a 2T.  Cut them while the fabric is still folded, so each side is the same.  You can stack both pieces as well...makes it even easier. (Tip:  Don't cut away any of the shoulder strap).


Now sew the two pieces together at the shoulder only.  Reinforce your seams with a zig-zag stitch (or serge if you are lucky enough to have a serger).


Now lay out your garment flat...


And zig-zag stitch all the way around the neckline, so it looks like this:


Now, you'll want to fold it over and sew a "hem" all the way around the neckline.  You can iron if you want, but I find it way more difficult than just being careful as I go (especially since it is curved).  Don't double fold the hem since we want to gather it later and that will be too bulky.  This works great, I promise.

Repeat the last two steps with the arm holes.


Sew up the sides of the tunic with the right sides together and reinforce the seam with a zig-zag again.

Almost there...

Lets gather the fabric now.  I did both the front and the back.  If you want to do just the front, then I would make the back piece a little narrower when cutting the fabric.

I just grabbed the fabric and bunched it with my fingers until I was happy with it.  I stuck a pin in ti and then compared it to the neck of another of Little Bean's dresses to make sure the size was right.  If your child has, err, a large head, you may want to try it on them before sewing this up to make sure that it will still fit over it.


Once your gather is pinned, thread up the old sewing needle.  I just simply went through the gathers about 1/4" down from the neckline.  I went back through a couple of times to ensure that it wouldn't come undone.  Tie a knot and that's it.

Finally, hem the bottom by folding over the fabric 1/4", iron down, fold over 1/4" again and stitch.  Or, you can use the same method that we used above for the neck and arms.

Voila! 


Seriously, wasn't that fast?  I may have to make several of these.  They jazz up a plain long sleeve t-shirt and leggings quite nicely, don't you think?


Enjoy!  And this should be the last post with horrid pictures.  Should be getting my new camera today! 

As always, comments are appreciated!